26 December 2012

On the First Day of Christmas...


Happy holidays everyone! I’m sorry that I’ve been a stranger to this blog all autumn. I’ve been working hard, and I guess sometimes you just have to give yourself a break and accept that you don’t always have time and energy for everything. I’ve neglected a lot of the things I normally love to do, but now I feel it’s time to reclaim those things. I guess it’s all about planning: I need to consciously make time for art again, as well as blogging. I’m starting with a short update on what I’ve been up to so far during my Christmas break.

I’ve been working on two new Pretty Purses:

Purse 1, quilted (in progress)


Purse 2, quilted (in progress)


and with added hand embroidery (in progress)


I’m also working on a mini quilt with the same poppy motif I used last summer.

Surface designed fabric ready to be quilted


Quilted, and with some hand embroidery (in progress)


And, joy of joys, I did some work in my sketchbook, inspired by patterns I found on a gift wrap and a flower pot:


And of course I have a Christmas knitting project…


for when I want to relax in the sofa with Fia the Terri(fi)er. (Mum’s busy hands can be seen knitting in the background.)


I hope you're having a wonderful holiday season! Thanks for dropping by! - Annika


19 November 2012

Whoo-Hoo?

I'm sorry that I have been a stranger to this blog this autumn! I hope you haven't forgotten me. It's not that I've been idle, on the contrary. I've been working like a horse with all sorts of crafts. I just haven't had the time and energy to blog about it all afterwards. I hope that will change soon! Until then, here's an image of a fun little wishing owl I did with the kids. (It's based on Lynn Krawczyk's pattern.) 


Thanks for still remembering me! - Annika


12 October 2012

Breast Pockets with Love from Finland

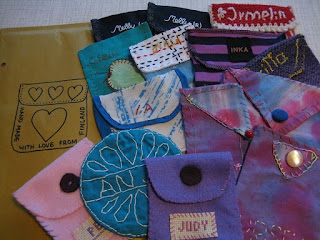
Last week I did my best to promote Melanie Testa's Breast Pocket Project on my blog, in Facebook groups and at the adult education centre where I currently work. I don't know how many of you blog readers joined the project (please leave a comment if you did!), but I got ten pockets from the fabulous women at the adult education cenre, two from my mum, and I made two myself: a total of 14 pockets! So far, that is, because there will probably be one more next week, which will travel to New York bravely on its own. A heartfel Thank You to everyone who joined the project! Here's a photo of the whole ensemble, getting ready for their journey across the Atlantic:


And these are my pockets, with some sort of sashiko embroidery. Melanie is the only "flattie" I know (of), so I made two pockets, as she is a full flattie.


And don't forget that October is breast cancer awareness month, so please give a donation to your local breast cancer reserach organisation. Even a small donation helps!

Have a great weekend, and thanks for popping by! - Annika

5 October 2012

Call for Art: Breast Pockets

(Ni som talar svenska kan skrolla ner en bit, så får ni samma information mera lättillgängligt.)

*****************

My friend and mentor Melanie Testa, whom I've mentioned many times on this blog, as she's had a major influence on my own creative journey, needs your help! Melanie is a breast cancer survior who has chosen against reconstructive surgery or prosthetics, and she wants to turn the repressive body image pressures off for women. Women should be allowed to feel sexy, strong and beautiful whether full, flat or half flat. Melanie wants to raise awareness and acceptance of this alternative, and therefore she has started an art project which involves breast pockets. She needs 1000 pockets before 22 October 2012.

Please, make a breast pocket (use Melanie's pattern, or your own imagination) for every woman you know that has chosen to forego reconstruction, add her name (first name only) to the pocket, and send it to Melanie to show your support. Leave a comment on her blog and she will contact you and give you information about where to send the pocket. If she receives 1000 pockets by 22 October, an ABC News reporter will do a story about the project. I will report back to you on how it went.

Please read Melaines blog post and recent article for more information, and visit her Facebook page.

Thanks! - Annika

*****************

Och eftersom detta är ett så viktigt ämne, så skriver jag samma sak också på svenska denna gång:

Min vän och mentor Melanie Testa, som jag har nämnt många gånger på den här bloggen, eftersom hon har haft ett starkt inflytande på min egen kreativa resa, behöver er hjälp! Melanie har överlevt bröstcancer, men valde att inte rekonstruera sina bröst eller skaffa protes. Hon vill avskaffa den press som läggs på kvinnokroppen om hur den ska se ut. Kvinnor borde få känna sig sexiga, starka och vackra vare sig de har båda brösten i behåll, är delvis platta eller helt platta. Hon vill väcka medvetenhet om och accepterande av detta som ett alternativ, och därför har hon startat ett konstprojekt som handlar om bröstfickor. Hon behöver 1000 bröstfickor före den 22 oktober 2012.

Snälla du, tillverka en bröstficka (använd Melanies mönster, eller din egen fantasi) för varje kvinna du känner som har valt bort rekonstruktion. Sätt hennes namn på fickan (bara förnamnet), och skicka fickan till Melanie för att visa ditt stöd. Lämna en kommentar på hennes blogg så kontaktar hon dig och ger dig information om vart du kan skicka fickan. Du som känner mig kan också ge eller skicka din ficka till mig, så skickar jag alla fickor jag fått in till Melanie om en vecka, dvs. fredagen den 12 oktober. Om hon får ihop 1000 fickor till den 22 oktober så kommer en ABC News-reporter att göra ett reportage om projektet. Jag återkommer senare med rapport om hur det gick.

Läs Melanies blogginlägg och en färsk artikel som hon skrivit så får du mera information om ämnet, och besök hennes Facebook-sida.

Tack! - Annika

*****************

Why not take the opportunity to try something new while making this quick little pocket project? I've wanted to try sashiko and a pocket is the perfect place to practise:

Varför inte pröva något nytt när du gör det här snabba lilla fickprojektet? Jag har velat pröva på sashiko och fickan är ett perfekt ställe att öva:


30 September 2012

Discharged!

Yesterday, as I was picking out my usual laundry detergent at the supermarket, my eyes stopped at something interesting: Dr Beckmann's Colour Run Remover (English link, svensk länk). Hah! Potential! I grabbed a package straight away.

Today I put Dr Beckmann's colour remover to the test, and it passed with flying colours. In fact, it was so efficient that nearly all the colour on my sample pieces flew away. But let's take this from the beginning.

On the package it reads that you should leave the item you want to strip of its colour soaking for at least 4 hours, perhaps even over night. So I mixed the powder in hot water from the tap,  took a few of my hand dyed pieces of cloth, which I'd folded and scrunched in tie-dye style, and plunged them into the colour remover. Now, I was expecting to leave the fabric there for 4 hours, so I wasn't paying much attention to what was happening in the bucket. I should have. Oh my! Dr Beckmann was quick to get the job done. Not even a minute had passed when I noticed that the first items I'd added to the liquid were turning very pale  So, I had to take everything out immediately. The first two samples were so pale that there was hardly any patterning on them at all anymore. But the other two: Yay! Cool! Bellissimo!

Before:


After:
 

Before:


After:


You wouldn't belive, would you, that this piece of fabric actually came from the bright blue one I show you above? Where did the rusty brown come from? It's gorgeous!

I also did some icecream tub dyeing with EMO Tuotanto's fibre reactive dye later. I'm trying to explore this product, since it's a Finnish brand, and a lot easier to get hold of for me than Procion MX dyes. I hope to discover ways of using the EMO dyes in the same ways that I've used Procion MX dyes. That would make me a very happy puppy.


I can't wait to get to the rinsing stage with these! Yum!

Thanks for stopping by! Have a great week! - Annika

23 September 2012

News from Planet Annika!

I'm sorry that I've been away from this blog for so long! I've started a new career, and to tell you the truth, I've been working like a dog to keep things under control. The ground under my feet is still a bit shaky, but I'm working at getting the balance between work and my private life right. Day by day, step by step. Here's a sneak image of two of my current projects. The knitting is my way of winding down and thinking about something else. The appliqué will form the back panel on a wrap-around tunic. More soon, I hope!


Thanks for visiting! - Annika

12 August 2012

Return to Normal

This week I've returned to reality and in earnest started planning the courses I'm going to teach for the next eight or nine months. And I'm glad to say that I'm enjoying it! Getting up earlier in the morning, having meals at regular hours, working, feeling useful and purposeful. It suits me.

I finished the Alabama Chanin fitted top that I prepared the fabric for earlier in this post. With a few changes to the pattern it fits me well, and I'm all set for something more decorative next time. Appliqué, reverse appliqué, dimensional appliqué, couched... I haven't yet decided what to do for my next A.C. project, but I know it's going to be fun. Here's the finished top:


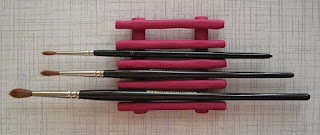
I've also done a little drawing and painting for Melanie Testa's workshop Dream Journals (you can still register). Head over to Flickr, if you're curious. Here's another fun little project I did this evening. I've been trying to find a brush stand like the one Melanie uses in her teaching videos, but without success. Then a friend told me that I could probably make one myself easily with oven-bake clay. Duh, why didn't I think of that? So here it is, my brand new brush stand in one of my favourite colours:


It's very simply constructed of seven rolls of clay that are stacked. I baked it upside down with kebeb skewers as support, to make sure it wouldn't sag in the oven:


That was a great little project. Brought out the inner kindergartener in me, and that's always satisfying.

Thanks for visiting and see you again soon I hope! - Annika

5 August 2012

Custom-Made Dream Journal

Ooh, time flies. Where does it go, I wonder? It seems I have so much to do at the moment, and by evening I've only done a fraction of it. I've had a very long vacation this summer, and I feel it's about time I got back to work. It's only a few weeks now until the first two classes I'm going to teach will start (the children's classes). Well, tomorrow's Monday again. The best day to start a new life, and to pick up old routines. I do need to get back to my routines. No more staying up all night and sleeping away half of the morning. Discipline!

Right now I'm participating in another one of Melanie Testa's online workshops at the Clever Guild: Dream journal (you can still sign up!). You can find some images of what I've done so far (not much, as usual) in my Flickr photostream. This workshop explores different techniques that you can use in your sketchbook or visual journal. And since I can't find the kind of sketchbook I want in the shop, I have custom-made my own sketchbook. A page in this book is only 15 x 15 cm (6 x 6 inches), which is a nice little format to work with if you're like me and easily get performation anxiety or fear of the Huge White Page. I can choose to work on a small single page, or on the 30 cm spread. I used smooth hot press watercolour paper (300 gsm/140 lb) for the pages, and cardboard for the covers. I covered the cardboard with my own breakdown printed fabric. Fun!


The signatures are sewn together, and the covers are also sewn onto the signatures. I used a technique I haven't tried before and which I learned from Laura Kemshall in an episode of DMTV. Before this book I've tried Japanese stab-binding, small pamphlets and the thirty minute multiple-pamphlet journal taught by Gwen Diehn in her book The Decorated Journal (follow the links for a look at the books/pamphlets in question). This binding method was both fun and easy, and here's the result;


I was a bit hesitant whether this kind of structure would work for a watercolour sketchbook, but figured that I'd just try it out to see what would happen. As you can see below, there is a gap between the signatures that can be problematic with watery paint.


However, I've decided that I'm not going to be bothered about it. If I want to lay a wash over a spread with a gap, I can always tape the gap or glue a piece of paper over it. Things are only a problem if you make them a problem.

Isn't this a beautiful binding method? I love the loops that form over the spine and the exposed signatures.


Now that I have the book, it's time to start filling it. This week's assignment for Melanie's workshop is to make 10 starts, that is to do something - anything - to 10 pages somewhere - anywhere - in the journal. Sounds like fun!

Thanks for reading, and see you again soon! - Annika

25 July 2012

Bloomers Bucket Hat

I'm out and about a lot right now, but in between errands, excursions and assignments I've managed to finish my bucket hat. I showed you the stencilled hat pieces earlier in this post. For decorating the hat, I used the reverse appliqué technique and added a simple beaded border along the edge.


I haven't yet started on the fitted top (follow the link above for an image of the printed fabric), but I believe it's coming up.

Thanks for visiting! More soon! - Annika

22 July 2012

A New Flatmate

I have a new flatmate! Her name is Donna (ok, the name tag says Diana, but she's definitely a Donna to me) and she moved in with me only a few days ago. And the best thing is that we're the same size, so she's going to help me out with dressmaking. Isn't that a great pal to have around?

Here she is:


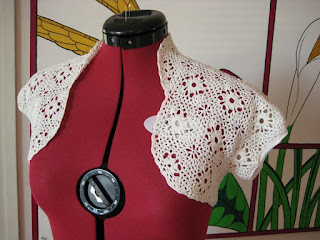
And below she is posing with the moth wings shrug that I've mentioned earlier in this post (,where I also posted a link to the pattern, should anyone be interested). A month ago the shrug was only an anonymous rectangle of crocheted squares, and now it's all finished:

Front


Back

Speaking of moths, I saw a new and interesting moth/butterfly the other day. Look at the patterning on the wings! Isn't that a beautiful border pattern? I might have to borrow it for something.


Thanks for visiting and see you again soon! - Annika


18 July 2012

More Stencilling!

There are certain names that I regularly return to in this blog. One of them is Melanie Testa, as you know if you've read my blog lately. Another name is Natalie Chanin of Alabama Chanin.

As soon as I finished my pretty purses I turned to another couple of projects that have been on my to-do list for a while. A couple of years ago I made myself a bandana according to the instructions in Chanin's book Alabama Stitch Book, but I've wanted to make myself a proper garment too. While I've been biding my time and soaking up knowledge, I've bought all three of her books, and have a whole Alabama Chanin library by now. I love all her books, and in the last one you get full-sized patterns for an Alabama Chanin wardrobe, along with instuctions, tips and inspiration. So the time is ripe to get started. I've also found it hard to just sit and watch while my friend Cheryl Razmus is whipping up garment after garment. Have a look at her gorgeous creations on Flickr.

I decided to start small and make a simple bucket hat and fitted top to try out the patterns before I embark on anything more complicated and time-consuming. So I dug out the good old 'Bloomers' stencil I used before for my bandana, and used it to print on the fabric for the hat


and for spray painting on the fabric for the fitted top.


The spray painting technique is what Chanin calls 'faded leaves' and the effect is created by spraying thinned paint onto wet fabric for a watercolour look. My paint didn't run as much as I expected, probably because the paint wasn't thin enough, or the fabric wet enough, but I'm pretty pleased anyway. I'll go for a runnier look next time. The main thing now is that I get an interesting fabric for trying out the pattern. I want to be sure of the fit before I invest all that effort into a more elaborate garment.

I'd just got rid of old, flaking nail polish when I got this new manicure. Oh well.


I didn't want to waste the paint that collected on top of the stencil so I flipped the stencil onto a piece of cotton and got this interesting texture.


I'm really exited about a new discovery I've made in the field of textile paint. Well, to be honest, I've known about these products for a long time, I just wasn't ready for them before now. I've mentioned the Finnish brand Emo Tuotanto's fibre reactive dyes before on this blog, but now I've also tried their mediums for printing on fabric. They have a thicker medium that is used for printing and a runnier medium that can be used for sun printing or spraying. The great thing about these mediums is that they come clear and you add the pigment yourself. So you can mix any colour you like in any consistency. I love it! Why haven't I used them before? (They also carry ready-mixed paints, which I have used until now.)

Liquid medium and print paste, along with liquid pigments to add to the mediums.


I realise that it might be difficult for my international readers to get hold of these products, but perhaps your own national brand carries something similar? Have a look around next time you are looking for textile paint! It's great fun to have the freedom to mix your own colours.

Thanks for visiting! To be continued... - Annika

17 July 2012

Good Things Come in Threes

Here they finally are, my little pretty purses! And I'm pretty pleased with them, if I may say so myself.


Let me give you a couple of hot tips. There are two things that helped me accomplish three purses in a relatively short space of time. I designed these purses with a particular purpose in mind, you see, and I had little time to fuff about. I needed to be efficient.

As regular followers know, these purses are inspired by and based on the techniques Melanie Testa presents in her book Inspired to Quilt (please refer back to this post for more info). In the book Melanie uses thickened Procion MX dyes to design her fabrics. However, I felt I wanted to do things quick and dirty this time, without having to soda soak or batch fabric. So I used fabric paints. Fabric paints work very well for monoprinting, as long as you keep in mind that you are dealing with a medium that dries fairly quickly. Have a plan before you spread the paint on the printing plate, otherwise you will discover that most of the paint got stuck to the plate instead of the fabric. Fabric paint gives the fabric a slightly plastic feel, but with monoprinting it isn't as bad as I expected, as the layer of paint is very thin. What I appreciated most was that the paint dried quickly, so there was hardly any waiting time at all. I was surprised by and pleased with the result, and I have come to appreciate fabric paints more after this experience.

My second hot tip is to work in a series. I'm not particularly keen on doing the same thing over and over again, I get bored too easily, but working in a series definitely helps you to produce more art, as you don't have to "reinvent the wheel" with every new piece. You learn things with each piece, and can apply your insights immediately in the next piece, so there is educational value in it as well. And when the motif is fixed, as it is in this case, I was able to concentrate on other things, such as colour and pattern. I'm not planning to always work in a series from now on, but I've realised that it is definitely something worth considering every now and then.

Here are a couple of detail shots (I love the way the monoprint makes the bud look hairy - that was serendipity):


As these are purses, I wanted the insides to be just as neat as the outsides, so I used embroidery thread also in the bobbin. That also helped me to get rid of any problems with thread tension and unwanted bobbin thread creeping up to the front.


I also bound the edges on the inside and added my own tag.

The tag is made from a piece of cotton ribbon with an inkjet iron-on transfer print.

And that's my pretty purses! I had a lot of fun with these.

Thanks for visiting and see you again soon! - Annika

16 July 2012

Two More Pretty Purses

By now I've quilted all three pretty purses (please refer to this blog entry for more information about pretty purses, and images of the first purse I quilted), and I'm off to buy zippers. Before I dash off, however, I'll share process photos of the other two purses.

Pretty purse nr 2:

Printed cotton and silk organza 
The two layers aligned
and quilted

 Pretty purse nr 3:

Printed cotton and silk organza
 The two layers aligned
and quilted

Thanks for visiting! I hope to have images of the finished purses soon. - Annika